Jumping Grids for Your Horse – Focus on Building Muscle
Do You Need Inspiration for Your Jumping Training? Jumping grids can seem complicated, but they
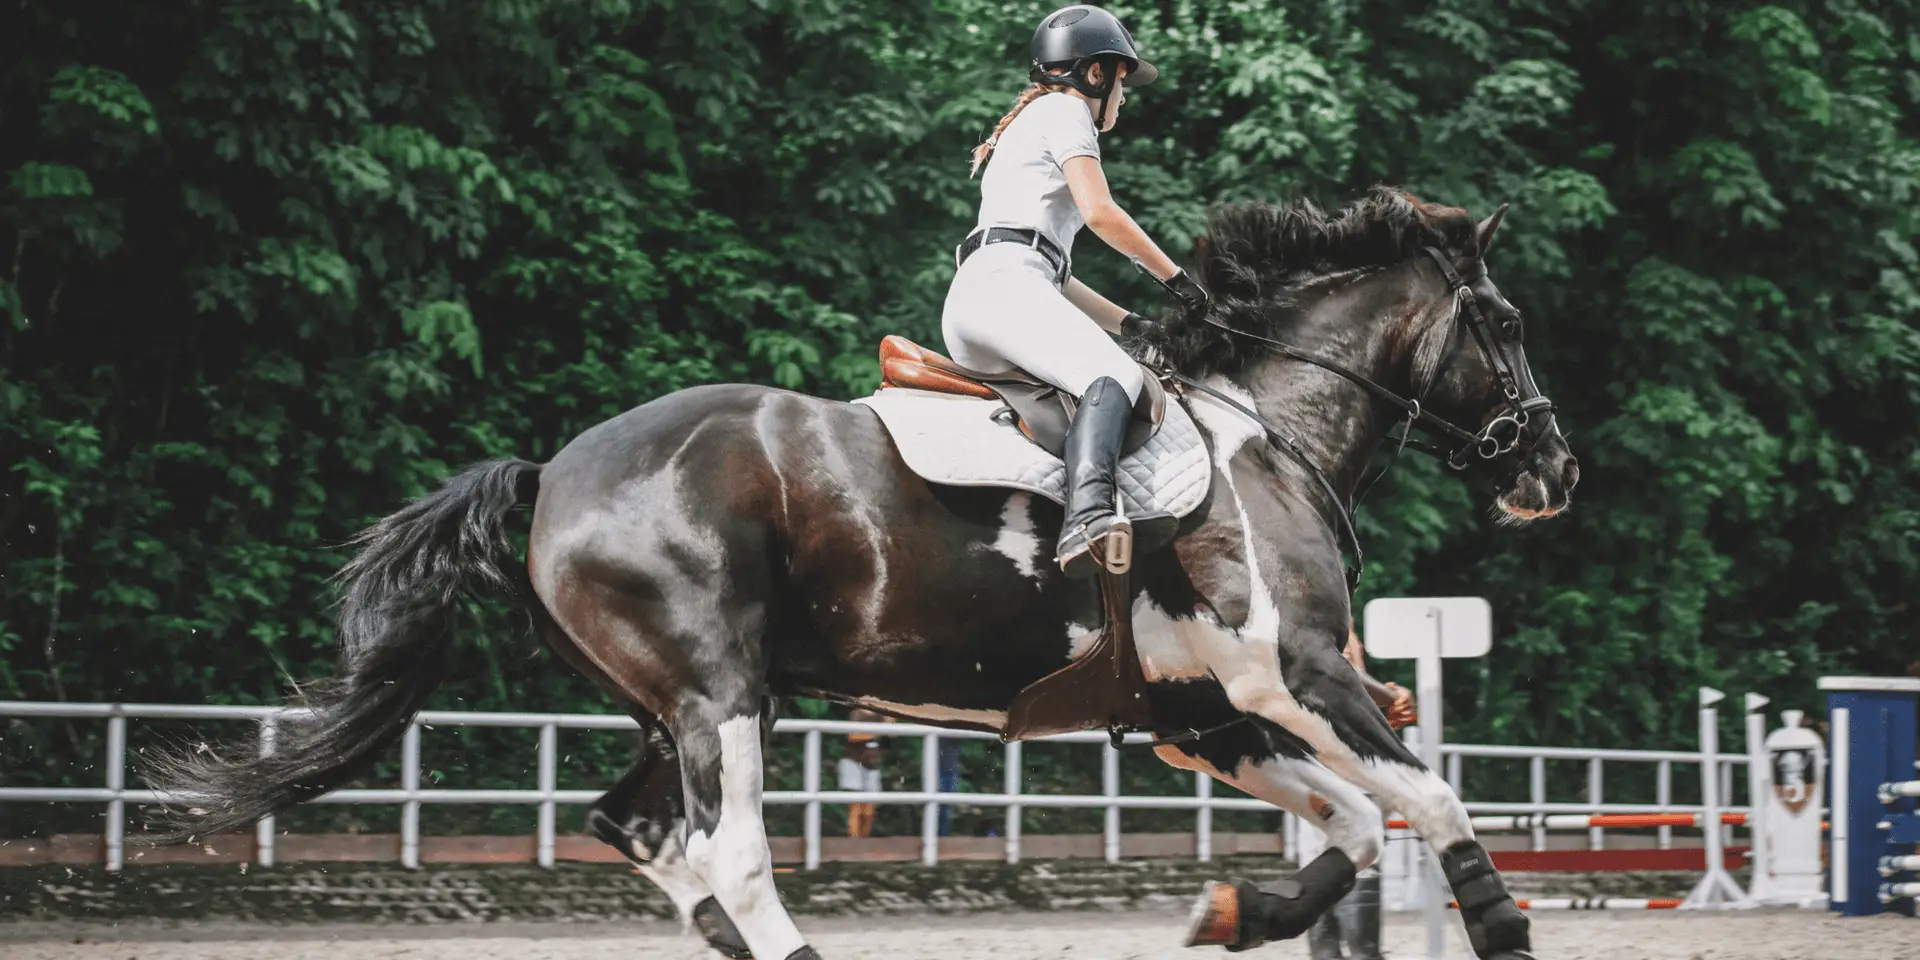
Jumping grids can seem complicated, but they don’t have to be. With these 7 exercises, you’ll have easy set-ups that will improve your and your horse’s skills.
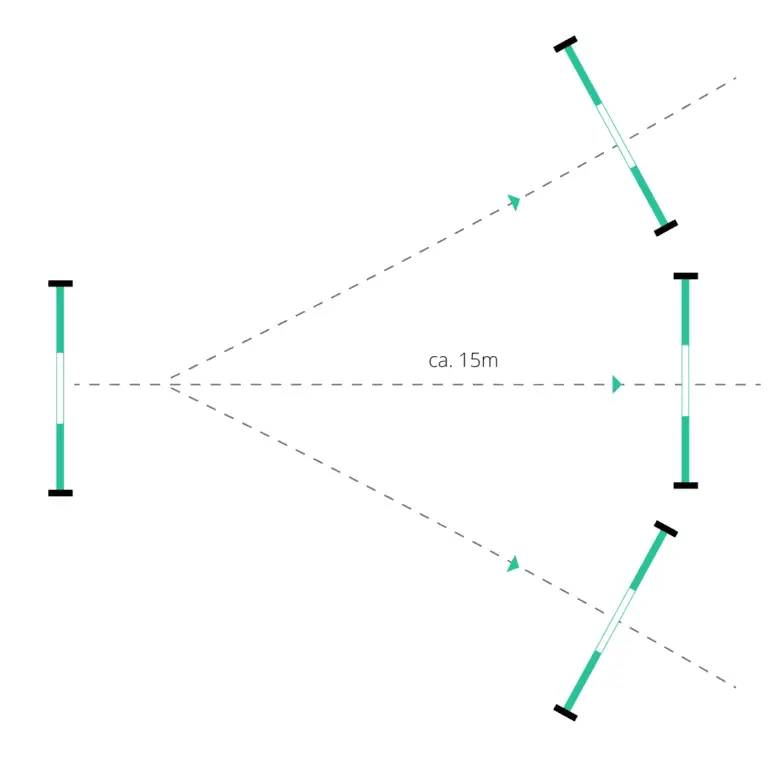
Let’s start with a simple series that promotes the attention of you and your horse. For this exercise you only need 4 jumps, i.e. 8 obstacle stands and 4 poles.
Position two jumps about 15 m apart. Place the other two jumps at an angle to the second jump so that the 3 jumps create a flat C on one side.
Now it’s time to ride! Canter over the single jump and then choose one of the three lines to the other three jumps. You should ride this distance with three canter strides.
If you have ridden this exercise a few times and feel confident, try riding this exercise in the other direction. The jumps can also be ridden individually. This way you even have a small course.
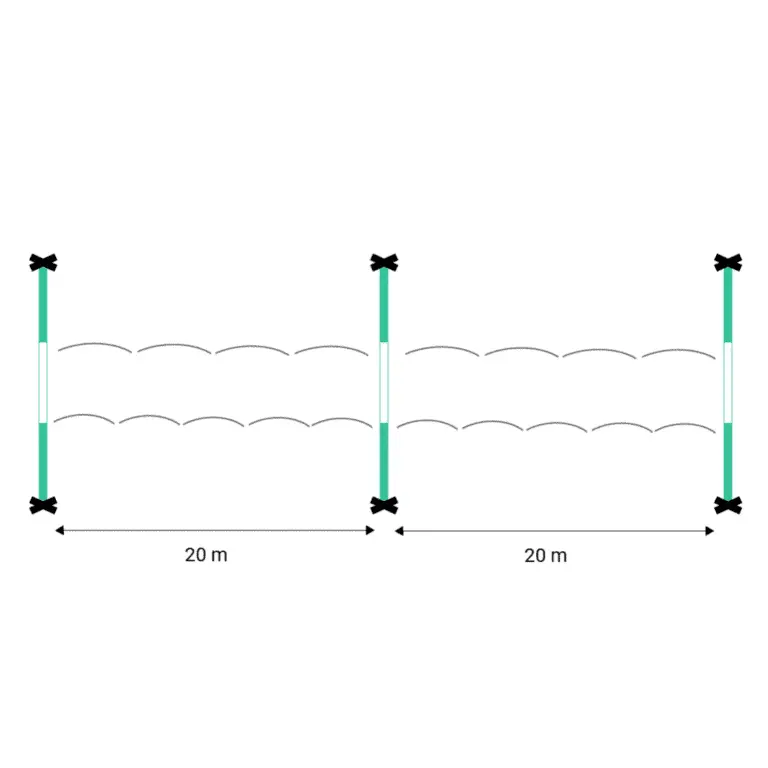
Next is a series that allows you to vary the number of canter strides inbetween two jumps. This exercise is also simple and quick. Set up 3 (alternatively 2) jumps with a distance of 20 m and you are done. If you want to start slowly, you can also replace all three, two or one jump with a canter pole.
You can now ride the set up row with either 4 “big” or 5 “small” canter strides and thus vary the number of strides between the jumps as you like. You may even be able to do 6 strides in the distance!
Does your horse often get too strong between jumps and you feel like he’s on the run? Then here is an exercise for stormy horses. With this series of jumps you can regain control.
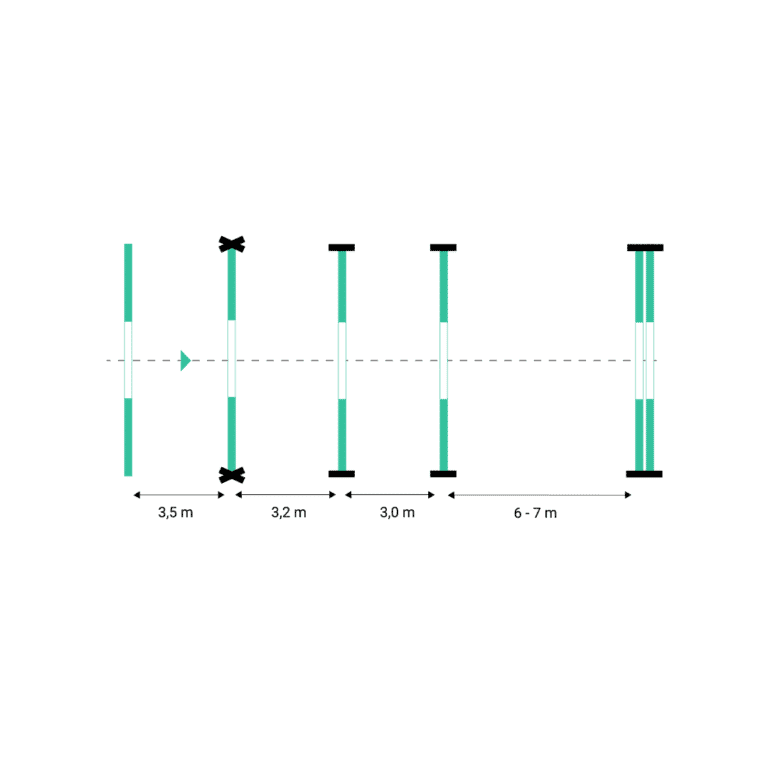
For this series of jumps you need a pole, a cavaletti, two vertical jumps and an oxer.
You set up the obstacle course on one of the long sides as follows:
The single pole is your starting point, the cavaletti follows at a distance of 3.5 m, the first vertical jump 3.2 m behind it. The distance to the second vertical jump is 3 m. Finally there is the oxer, which follows the vertical jump at a distance of 6-7 metres. This gives you one canter stride to the last jump.
Of course you can adjust the height of the obstacle to suit you and your horse. Crosses are also possible instead of the vertical jumps, so that the series is adapted to your level of ability.
Happie Jumping!
Changes of rein are the basis not only in dressage, but also in jumping. It is therefore all the more important to practise them regularly. And that’s exactly what this exercise is ideal for!
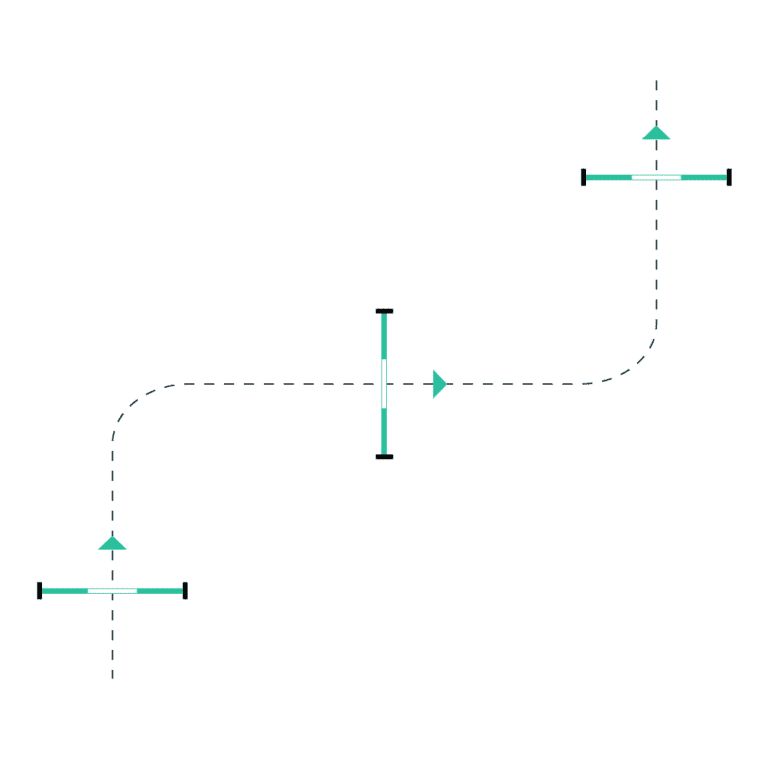
You don’t need much for the set-up, just 3 vertical jumps (alternatively cavaletti).
You place one of the three obstacles at X on the centre line parallel to the long sides of the track – this is your change line.
The other two jumps are placed on the long side as shown in the picture. And then you can mount up and ride off!
If you want to ride all three obstacles one after the other, start with the jump on the long side, depending on your hand, and cross it in the direction of E or B respectively. Then turn to the vertical jump in the centre, change hands and ride the last obstacle.
To add variety to this exercise, vary the riding path and ride the obstacles one at a time or jump only two vertical jumps.
A gymnastic series is not only great for your horse, but also for your sense of rhythm!
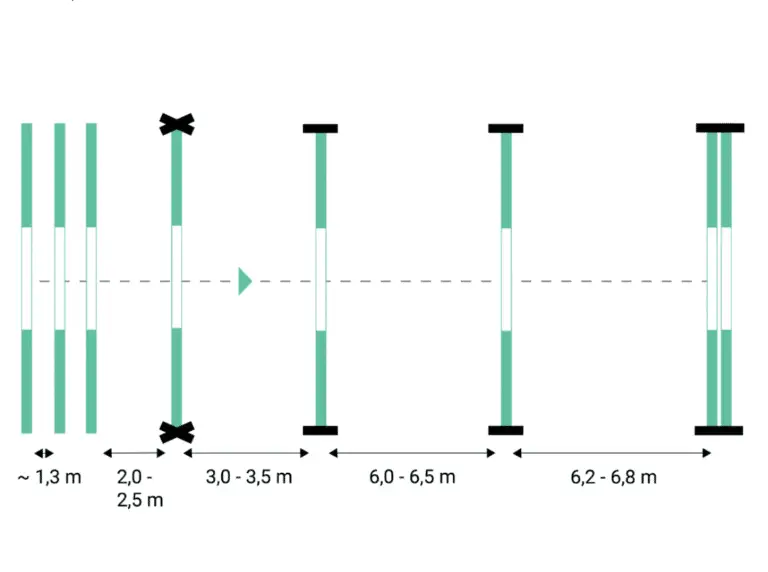
Start with 3 canter poles at a distance of 1.3 m from each other. After a distance of 2.5 m, we continue with a cavaletti. Then it’s time for two vertical jumps – 3.5 m from the cavaletti to the first vertical, 6 to 6.5 m to the second vertical jump. The last jump in the row is an oxer with a distance of 6.3 – 6.8 m.
Now the gymnastic row is set up and you can start riding!
Again, the height of the jumps is entirely up to you. Start smaller and gradually work your way up the holes!
Jumps on curved lines may not be everyone’s favourite, but this series is sure to be fun for you! And it’s quick to set up too!
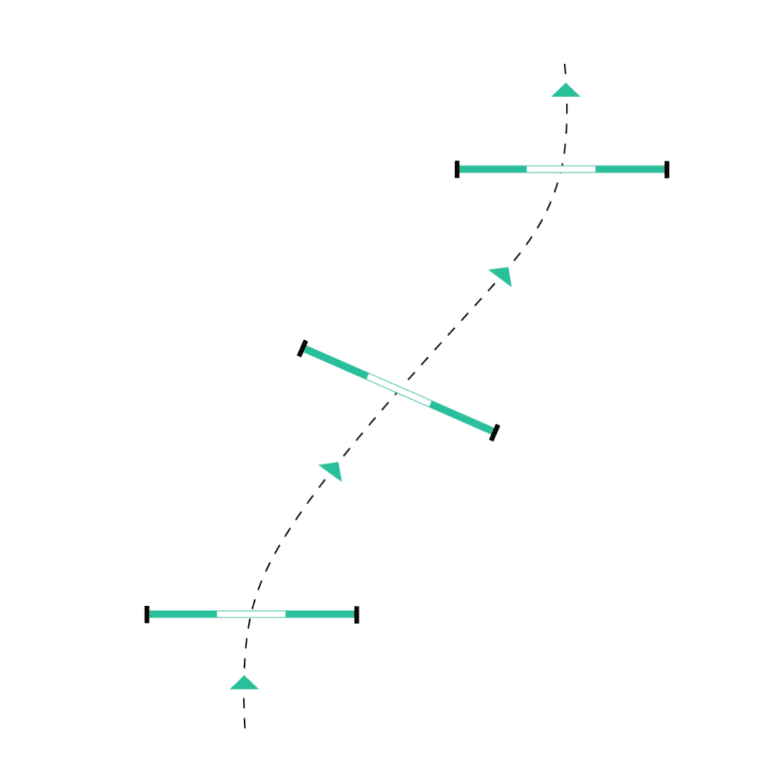
You need three vertical jumps for the serpentine jumping grid.
Set up the jumps so that you can approach the first jump in a straight line, position the second jump so that you can cross it in a curved line with a hand change, and set up the last jump exactly like the first jump, only on the other side. You can also ride this row from both sides – have fun building it!
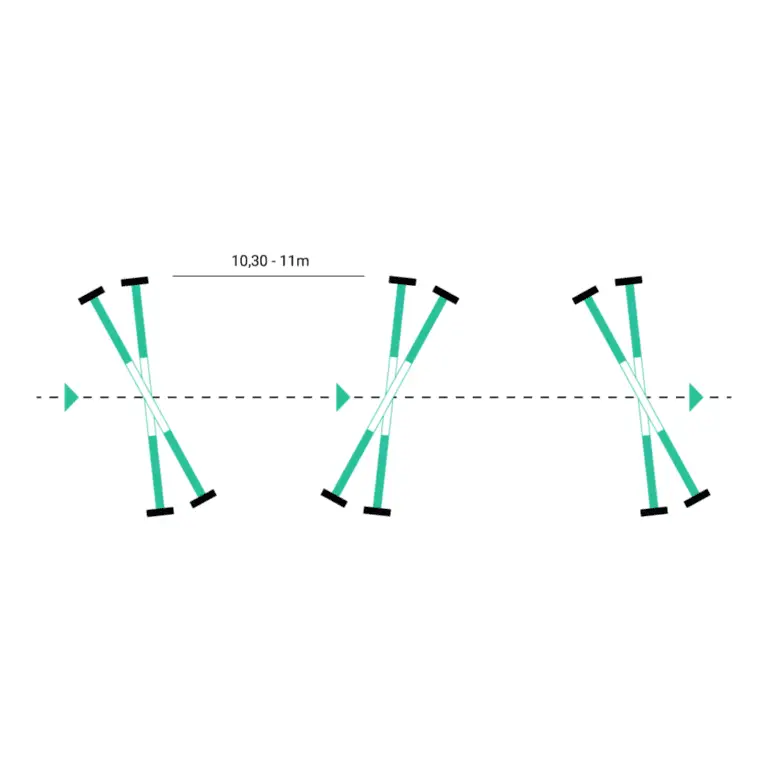
Don’t worry, this is not about maths – you don’t need a set square for these angles!
With this exercise you train your horse to ride straight and to pay attention.
Set up three cross jumps at a slight angle to each other, as shown in the picture. There should be a distance of 10.30 to 11 m from the centre of one jump to the next.
Make sure that you always start the row straight and in the middle!
Still haven’t found a suitable exercise? No problem! In the Happie Horse App you will find 300+ free exercises with descriptions and videos. Download the app for free from the App Store or Play Store!
And don’t forget: Tag @happiehorse_app on Instagram and TikTok when you copy an exercise!

Do You Need Inspiration for Your Jumping Training? Jumping grids can seem complicated, but they